

A cherry pie so good you won’t want to share it with anybody. Discover a few simple tricks to bake it to perfection, no soggy bottoms!

Cherry Pie, a Walt Disney Production
Time flies and soon it’ll be autumn again. I have been craving cherry pie for so long that I’ll better hurry and make one before it’s too late.


Growing up I thought pies were not a real thing, but a genius invention by Walt Disney. You see, we don’t have pies in Italy. We don’t have piecrust baskets filled with layers of fruits. We have similar delicious bakes, but nothing quite like it really.


As a child, I only saw pies in Walt Disney cartoons. Nonna papera (in English Gradma Duck) was baking these mushroom-looking tarts for her nephews. She always left them outside the window to cool down. I was so upset with Nonna Papera, how could she forget that someone always steals her pies if left on the window sill?


Cherry pie was a constant in American cartoons, and in my dreams.


Cherry Pie, an American dream
When I moved to the US, I was jumping up and down when I saw they served cherry pie at the university canteen. You could even have it with vanilla ice cream.

Brainwashed by Disney, I saw Mickey Mouse, Donal Duck, and my favourite Goofy in every slice. I became a regular at the pie counter.

I remember this all-you-can-eat canteen as the Willy Wonka factory. Like Charlie Bucket (or to be honest, like Augustus Gloop), I showered in food – not chocolate but banquets of pizzas, noodles, pasta, dips, tacos, all types of sodas, customisable milkshakes, waffles, and my much-loved cherry pie.

Oh, my first sugar rush! I run back to my dorm, read an entire textbook, and crashed into my bunk bed with the loudest headache.


I promised myself I wouldn’t do it again. I then forgot all my sins and punishments at the pie counter. Oh, cherry pie, I simply couldn’t say no!


Cherry pie, a homemade dessert
I started baking pies many years later when I moved to the UK.
For some unknown reason, I was intimidated by them. I thought pies were a difficult dessert. Plus, I didn’t want to compromise my sweet canteen’s memories.

One day, I watched a video on apple pies by the lovely Jenny can cook and decided to give it a try.
Oh my! Homemade pies are a million times better than the store-bought ones, and behold, even better than the canteen ones! You can taste the love in every butter flake and fruit layer.


If you have never made one at home, drop everything, and give it a go today! They generally take an hour to bake, but the preparation is quick and easy.
You just need to keep in mind three things:
- For a flaky crust, don’t overmix the dough and keep your hands cold. It’s weird but trust me, you still want to see a few white stripes of butter in your dough.
- Mix the fruit with one heaped spoon of cornflour. This will guarantee the absence of the ever-feared soggy bottom.
- Never, under any circumstances, leave your pie to cool down outside of a window. We have all watched a Disney movie, we all know the drama of the missing pie.

Back to the vegan cherry pie
My cherry pie is vegan as it uses oat milk for decoration and cashew butter in the dough. I am still not familiar with this butter, but in my opinion, it’s better (and sadly more expensive) than the coconut oil alternative.

I have used frozen cherries as I was too late in the season, but if you are lucky enough to have fresh ones, go ahead and send me pictures!

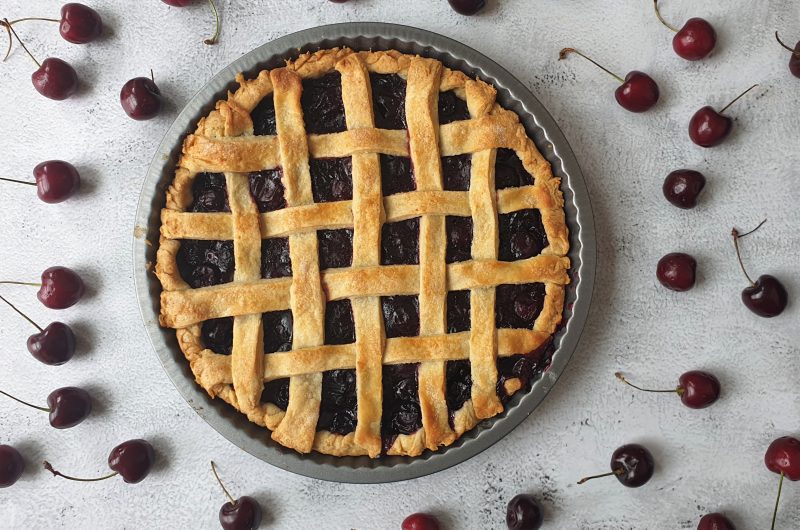
Vegan Cherry Pie, avoid the window sill
Course: Something SweetDifficulty: Easy6
servings30
minutes50
minutesA cherry pie so good you won’t want to share it with anybody. Discover a few simple tricks to bake it to perfection, no soggy bottoms!
Ingredients
- Pie Crust
300 g plain flour
40 g ground almonds
150 g cold cashew butter (diced)
20 g caster sugar
1 tsp salt
115 g cold water
- Cherry filling
500 g cherries
40 g granulated sugar
30 g cornflour
20 ml lemon juice (1 lemon)
1 tsp vanilla extract
1 tbsp unsalted butter
Method
- Add all the ingredients for the pie crust in a mixer. Wizz for only 2 minutes, you still want to see white stripes of butter for a flaky pie.
- Transfer the dough to a floured surface, give it a rectangular shape, one finger high, and let it chill in the fridge for one hour.
- Add all the ingredients of the filling to a pot, stir and reduce the juice on the hob for 3 minutes.
- Let the filling cool down for 15 minutes.
- Take out the dough from the fridge, roll out 2/3 of the dough on a floured surface. I use beeswax paper as a surface to transfer the dough to the pie dish much more easily.
- Transfer the dough to the pie dish. Be delicate but decisive – you got this!
- Now my favourite part begins: Take out a fork. Use the handle to ensure the dough sticks to the dish. Use the fork to prickle the surface, no soggy bottoms here.
- Spoon the filling into the pie crust.
- Roll out the remaining 1/3 of the pie crust. Cut it into nine stripes of equal width (1.5 cm if you are a precise baker).
- Lattice Pie Crust
- Lay 4 strips horizontally and evenly space them on top of the filling. Use the longer ones at the centre.
- Fold every other strip all the way back. Add one vertical strip, perpendicular to the other strips. Unfold the horizontal strips.
- Fold again the horizontal strips, always every other strip, this time fold the ones you didn’t move earlier. Add a vertical strip and unfold the horizontal strips. You can already see the pattern coming together! Keep going until you cover the entire pie.
- Back to the pie
- Brush with oat milk and sprinkle with granulated sugar.
- Bake for 45 minutes at 180 C (fan oven) until golden brown.


I totally understand what you said about being introduced to actual pies fairly late. We also don’t make them in Lithuanian cuisine. There are plenty of cakes and fruits, but somehow we missed the memo on cakes. I really like all the variations of pies that Americans have invented and popularised. I better speed up on making a fruit pie too, as very soon it will be my favourite pie season – pumpkin pie 🙂
Haha pumpkin pie season soon indeed ❤️